Dollarydoo 3 - The Front End
The front end

The user interface for Dollarydoo is a react web app that is served out of an S3 bucket. It doesn’t need anything fancy like server side rendering, and so it wasn’t too much hassle to use webpack to turn the Typescript into a single js bundle and have this referenced by the single html page. It’s a way to interact with The Server, to mine the precious proof of works, and to transact with other public keys.
The account problem
Do you remember the rule: NO DATABASES? This was one of my favourite parts of this system. I invented a problem for myself and it was fun trying to find a way to solve it.
Traditionally, when you have user accounts you would create a record in a database somewhere that contained a username, a salted + hashed password, some details like Display Name and then a way to reference your previously generated private key.
Your private key is essential to be able to transact with The Server. You must prove that you own a public key, and the way that this system does it is to have the client and the server each generate a shared secret (based on each other’s public and their own private key) - and use this shared secret as the key to a two way cipher - AES. So a payload of data would be encrypted and the key to encrypt and decrypt is known to both you and The Server, without ever sharing more than your public keys across the internet.
So that begs the question - where does each person’s private key … live? Where is it stored?
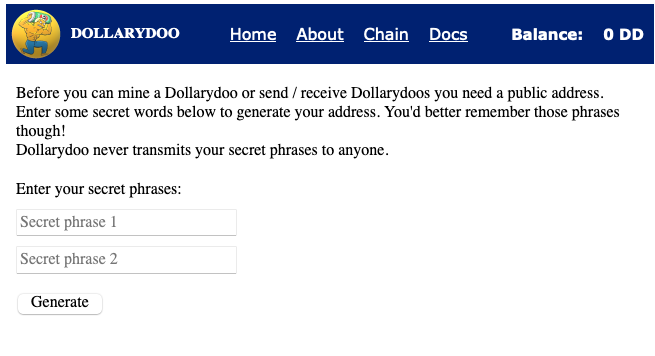
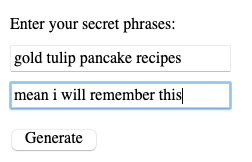
The answer is nowhere! It’s generated for you, on the fly, client side (in javascript), when you put 2 strings of text into the first screen you see here https://dollarydoo.potatodeveloper.com.
It’s like a username and password field, except it’s more like a password1 and password2 field.
I generate a sha256 hash of your two secret phrases concatenated together. I then use the hexidecimal representation of this hash as the INPUT for generating an ECDH private key.
When you use the same input in this setPrivateKey method you end up with a predictable output. Your public key will always be the same. You don’t need to store you private key on some server somewhere, or in a digital wallet of some kind. That being said, this is a Potato Developer system. It’s not going to be production ready, it just has to work and be fun to build.
If you’re serious about crypto currencies then I would definitely use a hardware security module.
The code looks like this.
// wallet.tsx

  private generatePublicKey() {
    const inputHash = getHash(`${this.state.secretPhrase1}.${this.state.secretPhrase2}`)
    const ecdh = crypto.createECDH("secp256k1")
    ecdh.setPrivateKey(inputHash, "hex")
    const myPublicKey = ecdh.getPublicKey("hex", "compressed")
    this.props.setPublicKey(myPublicKey)
    this.props.setECDH(ecdh)
    this.setState({
      secretPhrase1: "",
      secretPhrase2: ""
    })
  }

  render() {
    ...
    <input
        type="text"
        onChange={(event) => {
            this.setState({
                secretPhrase1: event.target.value
            })
        }}
        placeholder="Secret phrase 1"
        value={this.state.secretPhrase1}
    />
    <input
        type="text"
        onChange={(event) => {
            this.setState({
                secretPhrase2: event.target.value
            })
        }}
        placeholder="Secret phrase 2"
        value={this.state.secretPhrase2}
    />
    <br />
    <button onClick={this.generatePublicKey}> Generate </button>
    ...
  }
where getHash is
export const getHash = (clearText: string): string => {
  return crypto.createHash("sha256").update(clearText, "utf8").digest("hex")
}
So that means that for someone to be relatively safe, have NO account sign up, and best of all NO DATABASES used, we’ve got a neat little way to generate your ECDH private + public key pair.

*click*

Of course the down side is that you can never “reset password”. If you start using Dollarydoo while drunk and successfully mine a whole bunch of Dollarydoos and then don’t remember your secret phrases the next day - you’re out of luck. Those Dollarydoos are going to sit in the blockchain forever and nobody will be able to transfer them to someone else. So yeah, swings and roundabouts with this system design choice. I like it because nobody ever sees private keys and you can instantly start mining / transacting wherever you are in the world on whatever network. You never submit credentials anywhere except into that web browser’s DOM. Yes I know, I know, these can be snooped by software running on your computer; as I said, this isn’t meant for production.
So! We have the first major hurdle out of the way. We have an Elliptic Curve Diffie Hellman key pair. Now, let’s talk about sending Dollarydoos to someone else.
Transact
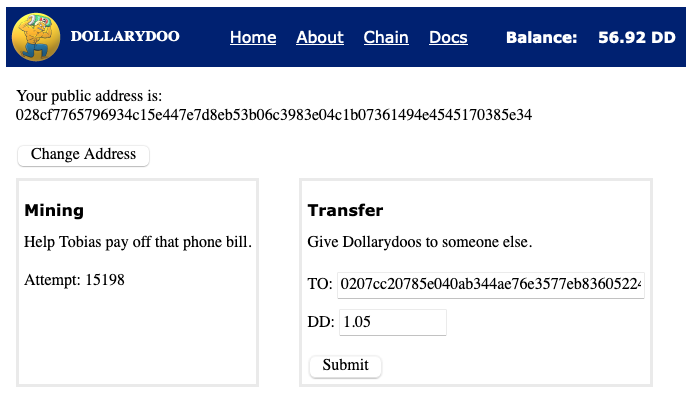
Give someone else some Dollarydoos. Don’t look at me, I don’t know what you’re giving an anonymous public key an amount of Dollarydoos for. Who knows what kind of transaction is taking place there. I don’t know. I don’t want to know. I can’t know. I don’t know who you are, I don’t know who THEY Are, hell - the to address doesn’t even have to be a REAL public key that I know about. You’re free to promise your Dollarydoos away in a transaction to: Santa Clause. If someone can find a way to generate a public key that equals that string, the Dollarydoos you transferred to that address are theirs.
Pretty cool eh?
The hardest part about the transaction step was to figure out a way to ensure that the sender had the right to send that many dollarydoos to someone else.
When submitting a transaction the sender
- Must be sending their own Dollarydoos
- Must not be sending to themselves
When The Server received a transaction request it needs to
- Ensure the sender is authorised to perform this transaction
- Ensure the sender has enough Dollarydoos to be able to cover the
amountin the transaction, and that includes any other pending transactions that they might have - Ensure the transaction was not modified during transit by a third party
Every part of that is easy except for “Ensure the sender is authorised to perform this transaction” and “Ensure the transaction was not modified during transit by a third party”. That’s why I’m super grateful for the mathematicians that invented public key cryptography.
The website used the following code to handle the submission of a transaction to The Server

// wallet.tsx
sendTransaction() {
  const intendedTransaction = {
    from: this.props.publicKey,
    to: this.state.transactTo,
    amount: this.state.transactAmount
  }
  const hashedIntendedTransaction = getHash(JSON.stringify(intendedTransaction))

  const sharedSecret = this.props.ecdh.computeSecret(this.props.serverPublicKey, "hex")
  encryptData(hashedIntendedTransaction, sharedSecret)
    .then((encrypted) => {
      attemptToTransact(
        this.props.publicKey,
        this.state.transactTo,
        this.state.transactAmount,
        this.props.publicKey,
        encrypted
      ).then((response: any) => {
        return response.json().then((data: any) => {
          if (data) {
            if (response.status === 200) {
              this.transactAmountField.value = ""
              this.transactToField.value = ""
              this.props.getPendingTransactionsForPublicKey(this.props.publicKey)
              this.setState({
                transactionResult: "Submitted to queue. Awaiting next proof.",
                transactTo: "",
                transactAmount: 0,
                transactionDidFail: false
              })
            } else {
              let error = data.error
              if (!error) {
                error = JSON.stringify(data.errors)
              }
              this.setState({
                transactionResult: error,
                transactionDidFail: true
              })
            }
          }
        })
      })
    })
    .catch((error) => {
      this.setState({
        transactionResult: error.message
      })
    })
  }

  ...

  render() {
    ...
        <h2 className={style({ fontFamily: FONT_FAMILY })}>Transfer</h2>
        <div>Give Dollarydoos to someone else.</div>
        <br />
        <div style={{ paddingBottom: 10 }}>
          TO:{" "}
          <input
            type="text"
            style={{ width: 300 }}
            onChange={(event) => {
              this.setState({
                transactTo: event.target.value
              })
            }}
            placeholder="Public Address"
            ref={(ref) => (this.transactToField = ref)}
          />
        </div>
        <div>
          DD:{" "}
          <input
            type="text"
            style={{ width: 100 }}
            onChange={(event) => {
              this.setState({
                transactAmount: parseFloat(event.target.value)
              })
            }}
            placeholder="Amount"
            ref={(ref) => (this.transactAmountField = ref)}
          />
        </div>
        <br />
        <button
          disabled={!(this.state.transactTo && this.state.transactTo.length > 0 && this.state.transactAmount > 0)}
          onClick={this.sendTransaction}
        >
          {" "}
          Submit{" "}
        </button>
    ...
  }
This resulted in a JSON payload like this going to The Server
{
  "from": "028cf7765796934c15e447e7d8eb53b06c3983e04c1b07361494e4545170385e34",
  "to": "0207cc20785e040ab344ae76e3577eb836052247396c566152fc030eff88f2c29d",
  "amount": 1.05,
  "sender": "028cf7765796934c15e447e7d8eb53b06c3983e04c1b07361494e4545170385e34",
  "encryptedBlob": "cc500277a8159439cf7da5c8247854592a923d74a2426e17ee6ac7a6efbc2743ace8e80daf72538cd9d90d05ee2d8619ff1d45ed1a79aded787efeb3cf0684bb95b18cd5beca07c5ef2f52e52ea85e21"
}
Now The Server needs to ensure that the transaction is allowed to take place. Here is the code for how The Server does so
import { Context } from "aws-lambda"
import { responseBuilder } from "../core/response-builder"
import { LambdaResponse } from "../core/types"
import { Blockchain } from "../core/blockchain"
import { BLOCKCHAIN_URL } from "../core/constants"
import { Transaction } from "../../../common/constants"

interface Event {
  body: string
}

interface Submitted {
  from: string
  to: string
  amount: number
  sender: string
  encryptedBlob: string
}

const blockChain = new Blockchain()
let chainLoaded = false

export async function handler(event: Event, context: Context): Promise<LambdaResponse> {
  if (!chainLoaded) {
    await blockChain.loadChain(BLOCKCHAIN_URL).then(() => {
      chainLoaded = true
    })
  }

  const submittedData: Submitted = JSON.parse(event.body)
  const transaction: Transaction = {
    from: submittedData.from,
    to: submittedData.to,
    amount: submittedData.amount
  }
  return blockChain.attemptToSubmitTransaction(submittedData.encryptedBlob, submittedData.sender, transaction).then(
    (transaction) => {
      return responseBuilder(200, transaction)
    },
    (error) => {
      return responseBuilder(500, { error: error.message })
    }
  )
}
where
// blockchain.ts

public async attemptToSubmitTransaction(
    encryptedBlob: any,
    senderPublicKey: string,
    transaction: Transaction
  ): Promise<Transaction> {
    //short circuit early
    // you can not submit a transaction `to` yourself
    // you can not submit a transaction where it isn't `from` you
    if (transaction.to === senderPublicKey || transaction.from !== senderPublicKey) {
      throw Error(INVALID_DETAILS)
    }
    if (transaction.amount <= 0) {
      throw Error(INVALID_DETAILS)
    }
    const validTransaction = await this.decryptMessage(encryptedBlob, senderPublicKey)
      .then(async (decrypted: any) => {
        const shaResult = getHash(JSON.stringify(transaction))
        if (shaResult === decrypted) {
          const balance = await getBalance(senderPublicKey, this.chain, this.pending_transactions)
          if (balance < transaction.amount) {
            throw Error(INSUFFICIENT_FUNDS)
          }
          this.pending_transactions.push(transaction)
          return transaction
        }
        throw Error(FRAUDULENT_TRANSACTION)
      })
      .catch((error: Error) => {
        if ([FRAUDULENT_TRANSACTION, INSUFFICIENT_FUNDS, INVALID_DETAILS].indexOf(error.message) < 0) {
          throw Error(FRAUDULENT_TRANSACTION)
        } else {
          throw error
        }
      })
    return validTransaction
  }
Now that we know how to send a transaction to someone else, we know that The Server doesn’t immediately write it to The Blockchain. This would be too cumbersome for starters (many transactions can happen) but the whole point of Blockchain is to have a chain of blocks, where each block contains a bunch of transactions. Enumerating the blocks we can also enumerate transactions for a certain public key.
So: We’ve found a way to make an account, we’ve found a way to give Dollarydoos to someone else - next up is the most important part of all, mining, with the intent to submit a valid Proof of Work. A valid Proof of Work will reward the discoverer with a transaction of Dollarydoos to them, and write all of the pending transactions into that new block, and then into the Blockchain itself - completing the whole story.
Mining
Mining is a process where your computer iterates over an incrementing integer to see if that integer is the right one that makes a certain algorithm return true.
Here’s how it works.
-
Get the last block in the blockchain. Find out what it’s
proofis. https://dollarydoo.potatodeveloper.com/chain.jsonAs of right now, the last known proof is
230492, in block number 13. We store this value in a variable calledlastKnownProof. -
Beginning of the loop. This is where your CPU performs hashing functions over and over and over.
If
attemtedProofis undefined, set it to 1.Concat
attemptProofandlastKnownProoftogether. In my example this would be a string “2304921”. Note, this is not addition, this is string concatenation. Store this value in a variable calledconcatProofs -
Sha256 the
concatProofsstring and store it in a variable namedguessconst guess = sha256(“2304921”); // “74fa4446a9a645787d307492f43a2154f8d16d47789b8b117c9bd37d13427c22”
-
Was the
lastKnownProofan even number? If so, splitguessin half and discard the second half of it. IflastKnownProofwas odd, splitguessin half and discard the first half of it. Store the remaining string in a variable calledremainder.lastKnownProofis indeed an even number, and soremainderwill be “74fa4446a9a645787d307492f43a2154” (the first half) -
Does
remaindercontain the string “123456”? If Yes, thenattemtedProofis the valid Proof of Work. You should IMMEDIATELY submit this to The Server and get rewarded with some Dollarydoos.If No, then increment
attemptedProofby 1, and go back to step 2.
Here’s how I implemented this
// mine.tsx

  attemptProof() {
      // this.props.chainsProof is `lastKnownProof` as described above
      // this.state.proof is `attemptedProof` as described above
    const validProof = isValidProof(this.props.chainsProof, this.state.proof, STRING_TO_FIND)
    if (validProof) {
      this.setState({
        isMining: false
      })
      this.sendAttemp()
    } else {
      this.setState((state) => {
        return {
          proof: state.proof + 1
        }
      })
      setTimeout(this.attemptProof, 1)
    }
  }
// business_logic.ts

export const isValidProof = (lastKnownProof: number, proof: number, stringToFind: string): boolean => {
  const concatProofs = lastKnownProof.toString() + proof.toString()
  const guess = getHash(concatProofs)
  const guessLength = guess.length
  const halfWay = parseInt((guessLength / 2).toFixed(0))
  const shouldBeInFirstHalf = lastKnownProof % 2 === 0
  const firstHalf = guess.substring(0, halfWay)
  const secondHalf = guess.substring(halfWay, guessLength)
  if (shouldBeInFirstHalf) {
    return firstHalf.indexOf(stringToFind) >= 0
  } else {
    return secondHalf.indexOf(stringToFind) >= 0
  }
}
where
export const STRING_TO_FIND = "123456"
where sending the proof to the server looked like this
export const attemptToSolveProof = (publicKey: string, proof: number) => {
  // remember the lambdas in the previous post?
  const url = `${API_BASE_URL}/solve`
  return fetch(url, {
    method: "POST",
    body: JSON.stringify({
      from: publicKey,
      proof: proof
    })
  })
}
This resulted in a JSON payload like this going to The Server
{
  "from": "028cf7765796934c15e447e7d8eb53b06c3983e04c1b07361494e4545170385e34",
  "proof": 134929
}
The Server receives the request to solve the next Proof of Work and evaluates if it’s correct. If it’s correct then it will reward that sender and also go find all the pending transactions and write all of those into the transaction section of a new block - and THEN - write that new block to The Blockchain (chain.json). Thus completing the suite of functionality that I set out to build.
//server/solve.ts
import { Context } from "aws-lambda"
import { responseBuilder } from "../core/response-builder"
import { LambdaResponse } from "../core/types"
import { Blockchain } from "../core/blockchain"
import { BLOCKCHAIN_URL } from "../core/constants"

interface Event {
  body: string
}

interface Submitted {
  from: string
  proof: number
}

const blockChain = new Blockchain()
let chainLoaded = false

export async function handler(event: Event, context: Context): Promise<LambdaResponse> {
  if (!chainLoaded) {
    await blockChain.loadChain(BLOCKCHAIN_URL).then(() => {
      chainLoaded = true
    })
  }

  const submittedData: Submitted = JSON.parse(event.body)

  return blockChain.attemptToSubmitProof(submittedData.proof, submittedData.from).then(
    (block) => {
      return responseBuilder(200, block)
    },
    (error) => {
      return responseBuilder(500, error.message)
    }
  )
}
and the Blockchain class handling the request
public async attemptToSubmitProof(proof: number, from: string): Promise<Block> {
  return new Promise<Block>((resolve, reject) => {
    const lastBlock = this.chain[this.chain.length - 1]
    // see if it's a valid proof
    const validProof = isValidProof(lastBlock.proof, proof, STRING_TO_FIND)
    if (!validProof) {
      throw Error("Proof not accepted. Someone may have beaten you to it!")
    }

    this.getPendingTransactionsFromS3(TRANSACTIONS_URL).then((transactions) => {
      // reward the brave soul who found this valid proof of work
      const transaction: Transaction = {
        from: DOLLARYDOO_PRIME_MINISTER,
        to: from,
        amount: REWARD_PER_PROOF
      }

      transactions.push(transaction)

      const chainTail = JSON.stringify(this.chain[this.chain.length - 1])
      const hashedChainTail = getHash(chainTail)
      // Add a new block to the blockchain
      this.addBlock(proof, hashedChainTail, transactions)

      return this.putBlockChainInS3().then(
        () => {
          // clear out the pending transactions in the bucket
          return this.putPendingTransactionsInS3([]).then(() => {
            // return the chain tail to the original caller
            resolve(this.chain[this.chain.length - 1])
          })
        },
        (error) => {
          reject(error)
        }
      )
    })
  })
}
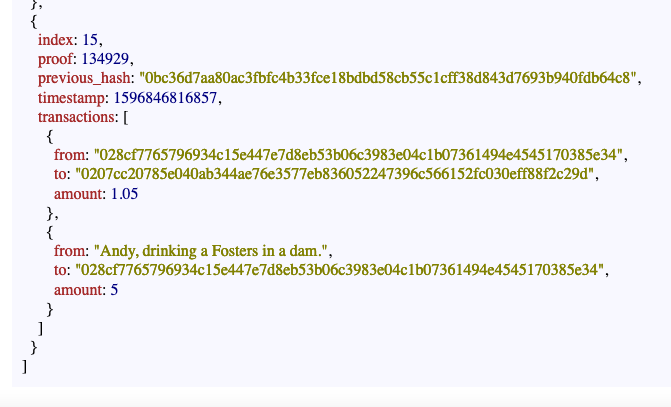
And look! The code where I transacted Dollarydoos from above, and then mined a valid Proof of Work resulted in the following block being written to the blockchain!
https://dollarydoo.potatodeveloper.com/chain

Conclusion
I learned a lot with this project. I found out first hand how public key based cryptography can be used to secure transactions over an unsecured network (e.g. The Internet). Thus far I had taken it for granted with SSL/TLS.
My react knowledge helped me build a front end pretty quickly, and I discovered how small architectural decisions to get something made quickly will result in larger problems in the future (e.g. the Node app that was always on and didn’t persist the blockchain anywhere).
Unit tests are crucial. I won’t say that I built this project fully TDD (Test Driven Development) but I definitely used it during the ECDH part of the project to ensure transactions were not mutated in transit.
I also learned that I could have achieved the same outcome for this project using completely different methods. I’m not trying to purport that my solution is either good or even recommended. That wasn’t what I set out to achieve. I set out to acquire knowledge, and I achieved that. I know things now that I had glossed over previously, and I would recommend this approach to all budding Potato Developers out there.
Be curious, ask a lot of questions (I asked colleagues at work and go some really excellent pointers) and just keep iterating. I watch Adam Savage’s One Day Builds on youtube and he talks about an experiment with students learning pottery. I can’t remember the object the students had to build, let’s say it’s a jug.
One group were told they would be rewarded by how many completed jugs they turned in, no emphasis on quality. It just had to work as a jug.
The other group were told they would be rewarded by how well their jug looks, the aesthetics, the correct form.
All the students get the same bunch of time to build jugs for submission.
At the end of the experiment the group of students who produced the best quality jugs (neither were told to build something with quality) were the students who were motivated to build the most jugs. They got the opportunity to learn from their mistakes more, because they were going through the actions of making a jug more than the students who were motivated by qualities closely aligned to “quality”.
Long story short: Build more things.
